Brushing your teeth used to be second nature, and now? You’re re-learning new ways to clean your teeth around your braces. It can be difficult to get used to this new process now that you’re on your straight smile journey, but it’s worth it! Proper brushing can make your appliances last longer, help you prevent white spots, and keep cavities at bay. If you’re struggling to brush your teeth with braces, sit back, relax, and read this blog from the team at Sawgrass Orthodontics. You’ll thank us later!
Brush & Brush Again
Brushing your teeth with braces comes with a whole new set of rules. You’ll want to listen closely to Dr. Kristen, Dr. Penny, and the team when they explain how to brush around the brackets and wires. Don’t be afraid to look up videos to help get a good visual for how to hold your brush because when it comes to learning your new routine, it’s all about the angles.
Just like when you brushed without braces, you’ll still want to spend two to three minutes brushing each morning, night, and after meals.
Hold your toothbrush at a 45-degree angle to brush both the exposed parts of your teeth, the brackets, and your gum line. Make sure you don’t cut corners and don’t forget to brush your tongue! It is essential to brush your entire mouth to get rid of bacteria that cause plaque buildup and bad breath.
Use the tools in your home care kit – like your proxabrush – to clean the hard-to-reach places between your brackets and behind the wires. Careful brushing can help prevent white spots that may appear when we take your braces off, so for the sake of your future smile, follow these rules!
Here’s a tip: Re-brushing is key! Usually, the Sawgrass Orthodontics team recommends brushing your teeth at least twice a day – but for the best results, you should brush after every meal. The brackets and wires that make up your braces add cracks and crevices to your mouth that weren’t there when you first learned how to brush your teeth. Food can easily get stuck in these places after lunch or your mid-afternoon snack. Wherever food is leftover, plaque can form, so the best way to take care of your teeth is to re-brush to make sure you don’t get any white spots or cavities.
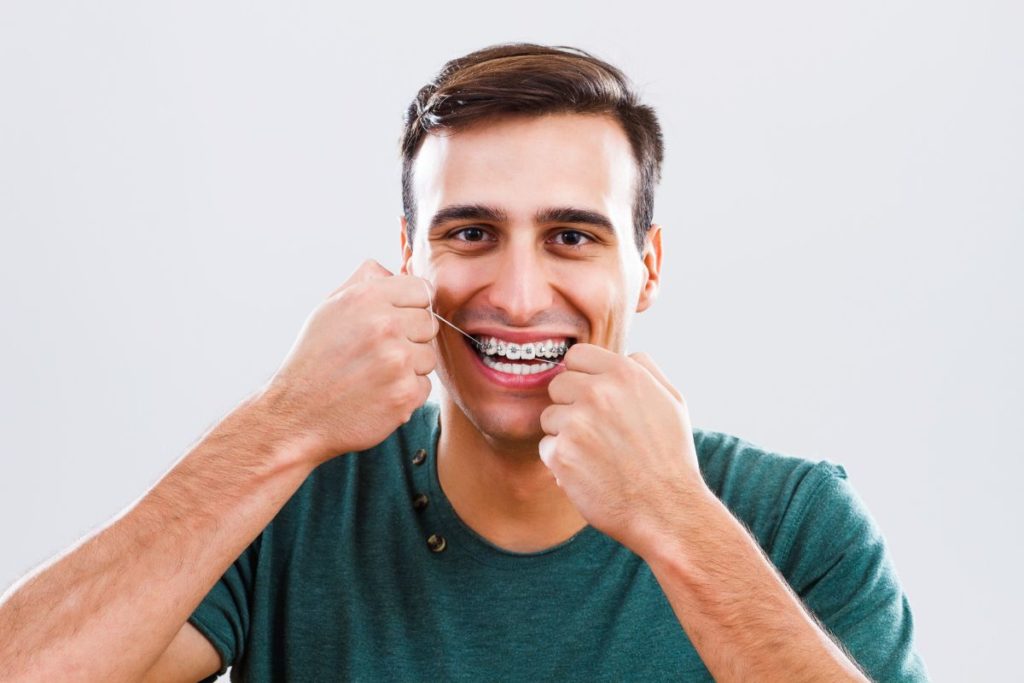

Dental Floss Is Your New Best Friend
We know that it’s common to drop flossing from your oral health to-do list, but it’s never been more important to keep up with than it is now you have braces. However, just like brushing comes with a learning curve, so does flossing, so take notes!
Thread the dental floss through the eye of a floss threader. Then, push the head of the floss threader over or under the wire and between your teeth. Remove the threader and lay it to the side. Floss each side of your tooth in a back-and-forth motion like you normally would without braces. Pick up your floss threader and repeat this step by moving to the next tooth! If you find that tricky, just grab one of the flossers we provide to get those hard-to-reach areas.
Be sure you don’t skip flossing. It is vital to the quality of your smile that you keep up with flossing throughout your treatment. The person in the mirror on the day your braces come off will thank you for it!
Here’s a Tip: If flossing with a traditional floss and a floss threader is too hard, try using a WaterPik instead! This tool uses a high-pressure stream of water to push small food particles out of hard-to-reach areas. Because it’s just water, it might be easier to use than a floss threader because it works wherever you aim the handle. Plus, it’s an investment – you can use it with or without braces!
Keep the Right Tools Nearby
The day Dr. Kristen or Dr. Penny applies your braces, you’ll also get a home care kit to take care of them. Make sure you hold on tight to this toolkit because it has everything you need to brush and floss your teeth with ease! We’ll include a soft-bristled toothbrush, a proxabrush, and a floss threader. Each tool plays a unique role in your oral health to clean those hard-to-reach places and be sure you’ll have a pearly white smile in no time.
Soft-Bristled Toothbrush – our team recommends a soft-bristled toothbrush to capably clean your teeth without harming the brackets. The soft bristles can better reach down between each bracket, making it easier to clean these tough-to-reach spaces.
Proxabrush – this tool looks almost like a pipe cleaner, and it works practically the same! The Proxabrush allows you to clean the spaces between brackets or wires that your toothbrush just can’t reach.
Floss Threader – like a needle, this tool helps you maneuver around the wires in your mouth to floss between your teeth without a hitch.
Not only does this kit help give you a head start toward caring for your teeth with braces, but it also teaches you which tools you’ll need throughout the time you’ll be wearing them so you can replace them as needed. If you have any questions about the contents of your home care kit, don’t hesitate to call Sawgrass Orthodontics – our team always has your back!
Here’s a tip: keep your home care kit with you wherever you go. It fits easily into your backpack, purse, or suitcase, and if it’s always handy, it can always help you. Trust us, it’ll save you a lot of worry in the long run!


Smile Brighter with Sawgrass Orthodontics
Your smile is your most important asset, which is why it’s so important to brush properly! With Dr. Kristen and Dr. Penny’s tips for brushing your teeth with braces, you’ll be on the road to oral hygiene success in no time.
If you don’t have braces yet, schedule your free consultation at our office in Sunrise or Weston to get started on treatment today!
Back to Blog